Hello World
This tutorial walks you through a Hello World project. This is the simplest project you can deploy to show end-to-end functioning of the Data Ingestion Framework (DIF).
The DIF pairs a specific data format (a JSON schema) with a Turbonomic probe. You deploy a DIF data server and configure it as a Turbonomic target. The DIF probe gets the data your target delivers, and uses it to add entities or metric values to the Turbonomic supply chain.
This tutorial shows you how to put this all together. Successfully completing it will prove that you have a valid environment to deploy and test DIF data. In this tutorial you will:
- Deploy a server that can serve up a JSON string over HTTP or HTTPS
- Create the data to add a single entity to the Turbonomic topology
- Validate your data against the DIF JSON schema
- Configure your DIF data server as a target in Turbonomic
Step 1: Deploy a DIF Data Server
A DIF data server is simply an HTTP or HTTPS server that can return a JSON string on request. The request must be a static URL that Turbonomic can use to GET this data at regular intervals. Just make sure the URL endpoint returns your JSON data.
For this tutorial, the JSON data is static, so you can serve it up from any web server
that your Turbonomic installation can access. This tutorial
assumes you already have a web server on your network that you can use.
You must be able to create a new directory on that server, and upload a
JSON file to it.
For this tutorial, we will assume your web server is on the domain, MyDomain.com,
and we assume your Turbonomic instance can reach it either directly or
through a proxy.
Go into the server and create the directory, www/dif/. Your server will serve up
the JSON data from here.
Note that the DIF data server domain should be a static address. In a real-world deployment, the static address ensures the same data server is available for the long term.
NOTE: If you don’t have a web server handy, you can use the sample node.js that we include in the examples repository. You can deploy that on any machine in your network that has node installed. You can even install node on your Turbonomic instance, and deploy the server there.
Step 2: Create the JSON Data
For this tutorial you will create a topology with a single Business Application entity. This entity will have the name “Hello World Tutorial”.
In the www/dif/ directory you
created, create a file named HelloWorld.json, and give it the following content.
{
  "version": "v1",
  "updateTime": 123,
  "scope": "Tutorial",
  "source": "",
  "topology" : [
    {
      "uniqueId": "Hello_World_BusinessApp",
      "type": "businessApplication",
      "name": "Hello World Tutorial"
    }
  ]
}
A brief description of this data is in order. The data object begins with typical initial information such as version, time of latest update, and other descriptors. For a complete discussion of these fields, see the the Schema Object description for Topology Object.
Of these initial fields, updateTime is important to consider.
In a real-world use case, you would
periodically update your topology data to capture changes in your environment.
As you do that, you should post the update time here. This could be useful for debugging
in case your management process stops updating the data. For this tutorial, any
arbitrary integer will do.
The topology itself is an array of entities. Each entity must include the following fields:
-
uniqueId:This identifies the entity among all other instances of that type in your topology. Because the ID must be globally unique, you should use naming conventions that express a namespace for this topology segment that you’re creating.
-
type:The type of entity you are creating. For this tutorial we are creating a Business Application. DIF currently supports the following entity types:
businessApplicationbusinessTransactionservicedatabaseServerapplication
-
name:The display name for the entity. This is not required to be unique, but it is usually convenient to give unique display names.
An entity can include other properties, such as metrics to show utilization of resources, or relationships to other entities that stitch it into the Turbonomic topology. For this tutorial we will not explore any of these properties.
After you save the file, your DIF data server should be able to serve up the JSON data.
To test it, use the following command, assuming your own domain, and assuming you
named the file HelloWorld.json:
curl MyDomain.com/dif/HelloWorld.json
The curl output should mirror the data you saved to the file.
Step 3: Validate Your JSON Data
Your DIF data server is now able to serve a topology to Turbonomic. But before you do that, you should validate the data to make sure it complies with the JSON schema. As you develop JSON constructs, it is a good idea to validate your work. This can save you time, and can avoid problems where you don’t get the results you expect.
There are many validators implemented against JSON Schema draft 7. You can even deploy them in your data process to make sure you always generate valid data. For this tutorial we will use the online validator at:
https://www.jsonschemavalidator.net/
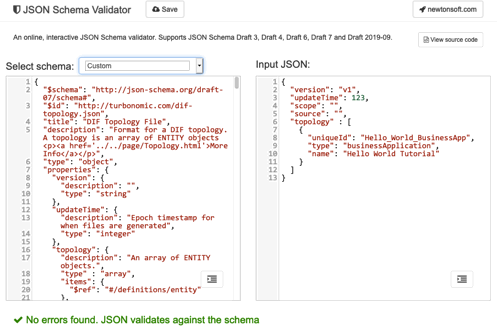
Copy the content of the DIF schema from FICTION ALERT: NEED SCHEMA LOCATION. Then navigate to the validator and paste the schema in the left-hand panel. Then copy the content of your JSON file and paste that into the right-hand panel. You should see no errors.

FICTION ALERT: THIS ASSUMES THE SCHEMA IS IN A SINGLE FILE. I SPOKE WITH PALLAVI AND SHE AGREES WE CAN DO THAT.
Step 4: Configure the DIF Data Server as a Turbonomic Target
Now that you have:
- A web server with a
difdirectory - A DIF data file named
HelloWorld.jsonin that directory - Validated the DIF data
You can set up the DIF data server as a target.
Go to your Turbonomic user interface, and navigate to SETTINGS > Target Configuration. From there, click NEW TARGET and choose the Custom target category. Within that category, click the Data Ingestion Framework target type.
Target configuration requires two fields – The URL to your DIF data (the JSON file you created), and a name for the target. Assuming you set up your web server according to the tutorial steps, you can give the following values:
- URL:
http://MyDomain.com/dif/HelloWorld.json - NAME:
Tutorial_Metric_Server
To finish the configuration, click ADD.
If all goes well, Turbonomic displays the Target Configuration page, and you should see the Tutorial_Metric_Server target in the list. It should be green, which means it successfully validated.
If the target did not validate, make sure that the URL you specified actually returns the JSON data. Also, you should ensure that the data is valid for the DIF schema.
Turbonomic requests data from targets at 10-minute intervals. Assuming your target validated, then within about 10 minutes you should see your entity in the Turbonomic supply chain.
In Turbonomic, navigate to SEARCH and select
Business Applications. In the Search field, type Hello. The
Hello World Tutorial entity should appear in the list. Click on that entry,
and Turbonomic should change scope to show the
entity in the Supply Chain.

Wrap Up
This is the simplest possible use of the Data Ingestion Framework to load an entity into Turbonomic via a custom target. If you got this far, you know that you can produce DIF data and validate it. You know that you can deploy a DIF data server, and use it to serve up the DIF data. And you know that you can configure the data server as target.
For a real-world use case, you will want to create a fuller topology, and stitch it in with the rest of your environment. You will also want to track utilization of resources, and expose them as metrics in the DIF data.